Mastering Depth and Scale in Landscape Photography
Capturing a sense of depth and scale in outdoor photos makes a flat image feel three-dimensional and immersive. A powerful technique is to place interesting foreground elements close to the camera and use a wide-angle lens (or experiment with a telephoto). As Michael Frye explains, “find an interesting foreground (preferably with leading lines), get the camera low and close to that foreground, and use a wide-angle lens”. This near-far juxtaposition exaggerates the size difference between foreground and background, tricking our eyes into perceiving space. For example, placing wildflowers, rocks, or a hiker right at the feet of the lens while framing distant peaks makes the scene feel vast and three-dimensional. Getting low (even down on a tripod) emphasizes the scale difference: the foreground subject looms large, while distant mountains remain small. Classic masters like Ansel Adams employed similar layering: his Clearing Winter Storm shot in Yosemite (1944) has close trees, mid-distance hills and foggy peaks, creating depth even with a normal lens. In practice, beginners can apply this by: composing with a nearby object, shooting at small apertures (e.g. f/8–f/16) for maximum sharpness, and focusing a third into the scene to keep foreground and background in focus.
SHOT ON A TELEPHOTO LENS 70-200MM
Using Leading Lines and Converging Perspective
Another key to depth is leading lines and converging perspective. Lines – whether trails, rivers, ridgelines, fences or tree rows – that start in the foreground and point into the frame pull the eye inward and accentuate distance. As Outdoor Photography Guide notes, “leading lines encourage the eye to travel deeper into the scene”. For instance, a winding mountain trail or a receding river acting as a diagonal line draws viewers from front to back. Converging lines (such as a road narrowing toward the horizon) create powerful cues of distance. You can even use repeating patterns or S-curves (like a switchback trail or layered rock strata) to guide the gaze from near to far. This works with any lens: even telephoto shots use composition cues. Frye points out that “leading lines, converging lines, and s-curves – visual cues about perspective and distance – can also work with telephoto lenses”.
Practical tips: Scout for natural lines in adventure settings – e.g. mountain ridges, hiking paths, river banks – and compose so they emanate from the lower part of the frame. Get low to accentuate how those lines converge. If your camera allows, switch between wide and telephoto: a wide lens will make the path look longer and more dramatic, while a telephoto can compress and overlap lines in interesting ways (see next section).
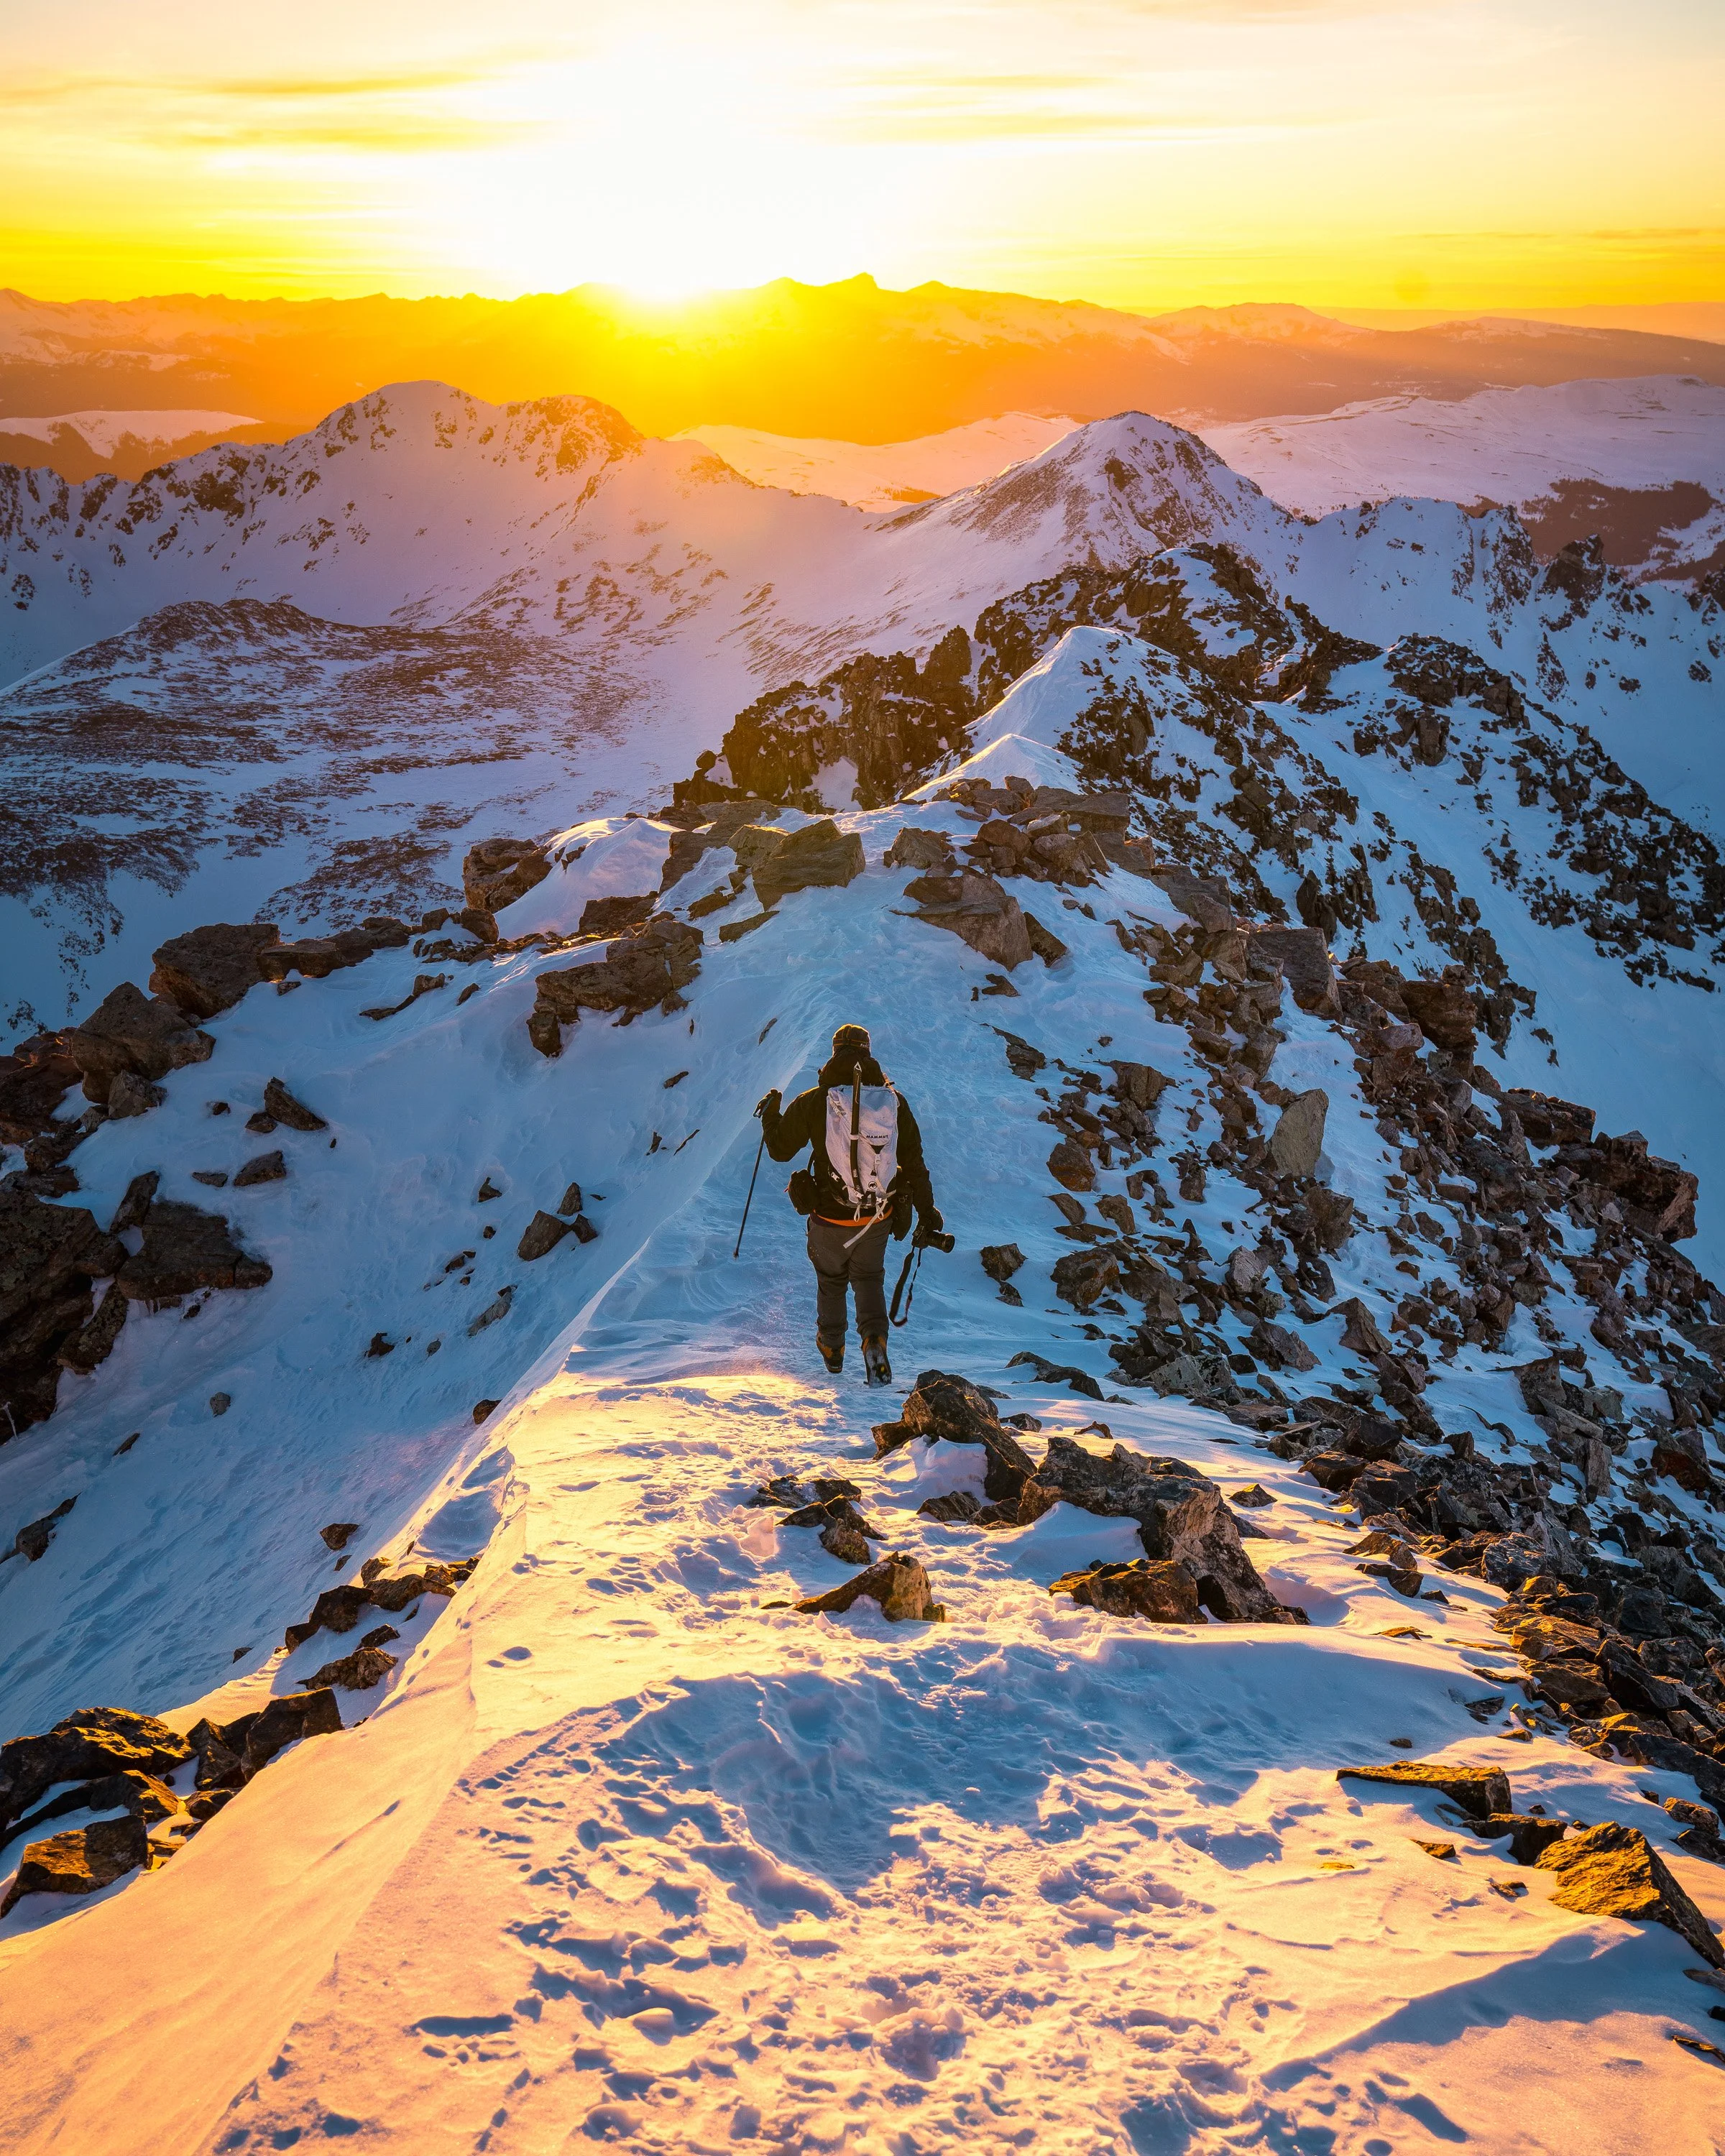
A 24-70MM LENS CAPTURE AT THE TOP OF A 14,000 PEAK IN COLORADO.
Lens Choice: Wide-Angle vs. Telephoto
Your choice of lens dramatically affects depth perception. Wide-angle lenses (e.g. 14–24mm on full-frame, or 10–18mm on APS-C) can expand a scene and emphasize vastness. They “stretch an image, making the scene appear vaster and more expansive”. By getting close with a wide lens, you exaggerate perspective – foreground objects loom while distant ones shrink, giving a strong depth effect. This is why many landscape shooters carry an ultra-wide zoom (such as 16–35mm f/4 or 14–24mm f/2.8) or even a fisheye for creative distortion. For adventure shooters, a wide lens on a backpacking trip captures the whole mountain amphitheater or glacier in one shot.
Gear tip: A compact wide-angle zoom (e.g. Nikon 16–35mm f/4, Canon 11–24mm, or similar third-party 15–30mm) is great for travel. Pair it with a sturdy tripod and a remote trigger so you can put the camera near ground level safely.
By contrast, telephoto lenses compress space. A long lens (70–200mm, 100–400mm or more) makes distant layers appear closer together and larger relative to each other. In real landscapes, this flattens planes: peaks and trees that are miles apart can seem stacked. Telephoto “magnifies your subject, providing the psychological effect of making a scene look larger-than-life”. Use this to highlight layered mountain ridges or to isolate a climber on a distant face. For example, on a mountain hike, you might zoom in on a ridge with a lone figure – the person and peak appear almost side-by-side, exaggerating scale. However, telephoto loses some obvious near-far depth, so it’s often paired with perspective cues (like overlapping objects or atmospheric haze) to hint at distance.
Practical tip: If your foreground is uninteresting, step back and switch to a telephoto. A hiker positioned far away will look small against a nearby rocky outcrop. B&H Photo explains that a telephoto “compresses” the scene – e.g. a long lens will show a shorter stretch of road tapering off. In camera setup, use faster apertures (f/4–f/6.3 on a tele) to control depth of field, and consider image stabilization or a tripod since you’ll often use longer shutter speeds when zoomed in.

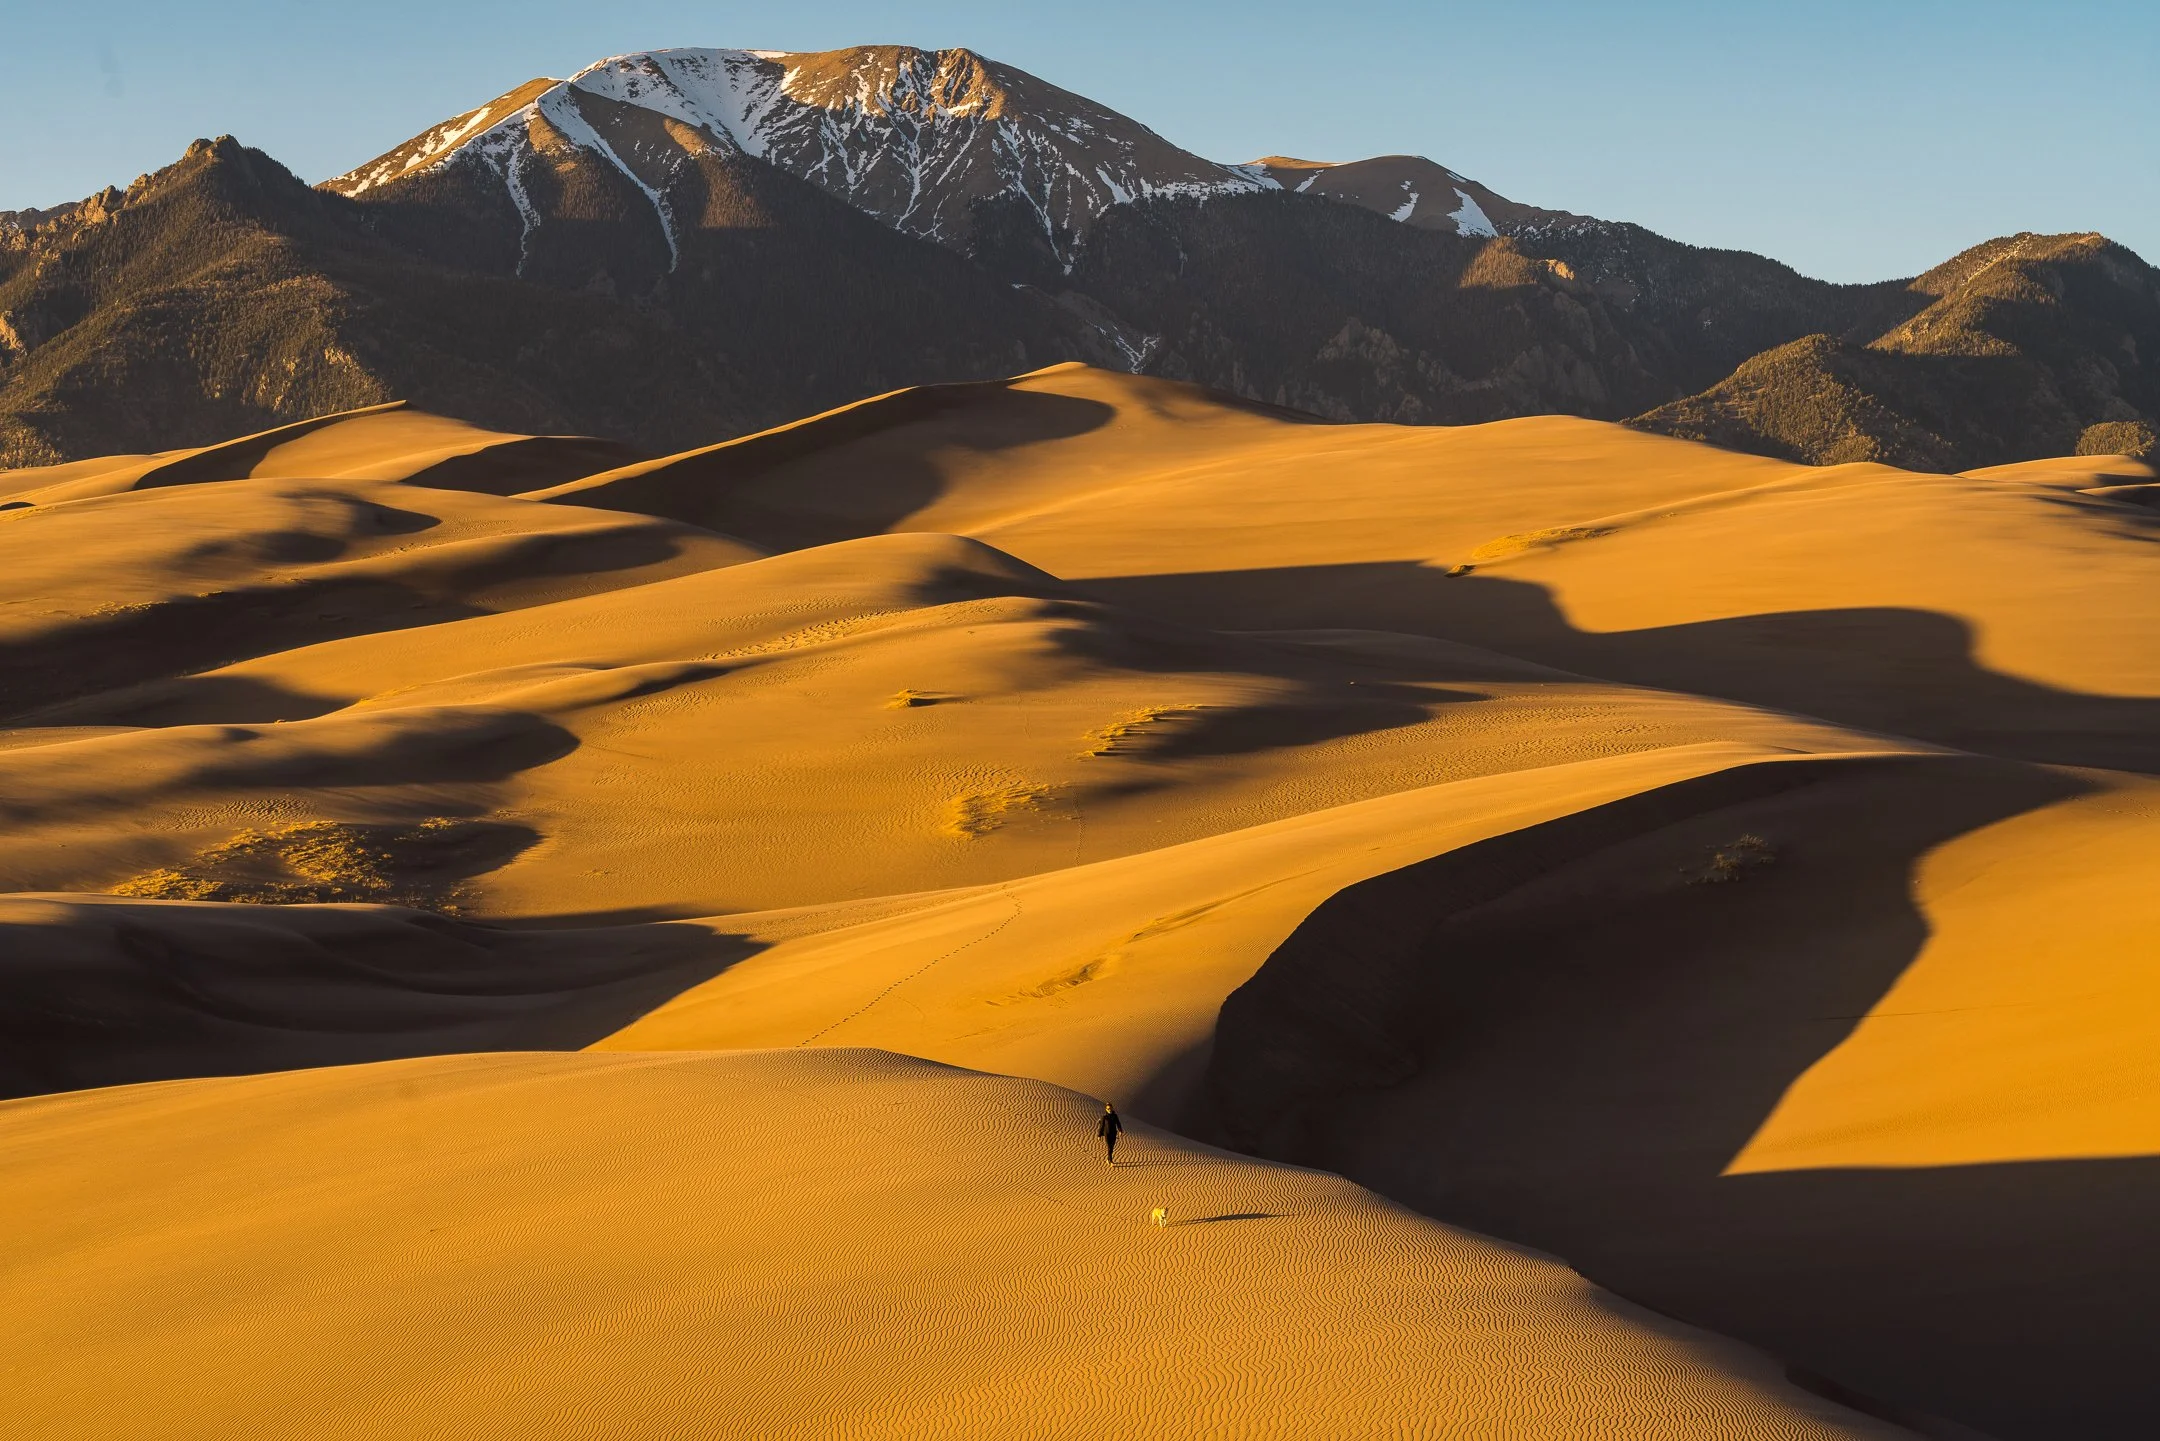
A TELEPHOTO SHOT (70-200MM) MAKES THE SAND DUNES APPEAR LARGER THAN LIFE SHOT AT GREAT SAND DUNES NATIONAL PARK, COLORADO
Atmospheric Perspective and Layers
Atmosphere is nature’s way of adding depth. Haze, mist, fog or even dust cause distant objects to lose contrast and color – a classic phenomenon called aerial perspective. Distant mountains become bluer and fainter, while foreground remains sharp and saturated. Turner exploited this in painting, adding smoke and haze so background forms faded into blue (dark shadows up front, pale colors far away). Photographers can do the same: shooting when mist fills the valley or after a light rain can instantly create layers of tonal depth. For example, sunrise fog in a canyon will separate each ridge into different tonal bands.
CLOUD INVERSION IN THE ROCKIES OF COLORADO.
Practical tip: Plan shoots for golden hour and changeable weather. Early morning or clearing weather often provides mist or low clouds that define distance. In alpine settings, shoot near timberline after storms: clouds drifting between peaks produce dramatic layers. Use a polarizing filter or digital editing to manage haze (it can also cut glare and darken skies, further emphasizing distant layers). Remember, even without visible mist, very long views (e.g. across a desert or ocean) often have subtle atmospheric fadebhphotovideo.com. Embrace it: include several visible layers (foreground rocks, middle ridge, far peak) so that the fading color and contrast become a compositional element.
Using Scale with Familiar Objects
Showing scale often means including a familiar object as a size cue. The easiest is a person. Photography Life notes that “the farther from the camera a person stands… the larger a landscape looks by comparison”. Even a tiny human silhouette in the frame can convey enormity. On the trail, recruit a friend (or use the timer) to stand on a foreground rock or peak. Climbers know this trick: a shot of a climber high on a cliff instantly tells viewers how massive the wall is. Wildlife (e.g. a distant bear or eagle) can also add scale, though opportunities are rarer. If people/animals aren’t available, man-made objects help: a car on a winding road, a rustic cabin in a valley, a tent perched on a ridgeline, or a mountain hut on an alpine summit to give context. Boulders, trees, and benches also work since their typical size is known.
Practical tip: Keep humans small in the frame (e.g. fill bottom 5–10% of the image) so they don’t dominate; the goal is they demonstrate size, not steal focus. When shooting hikers, use a zoom to compress the distance between them and background (for scale) or a wide-angle to place them amid sweeping scenery. Always watch focus: on ultra-wide lenses, manually focus a third into the scene so the person and distant peaks are both sharp.

Aerial and Elevated Perspectives
High viewpoints and aerial shots add a unique sense of scale. Climbing higher (tower, ridge top, drone, or helicopter) gives a bird’s-eye perspective that compresses depth cues differently. From above, you can see entire valleys, winding rivers or ridgelines at once. A drone shot of a mountain range flattens the scene so distant peaks share the frame with near cliffs, making scale immediate. On foot, try scrambling to sub-peaks or use a chairlift/gondola: shooting down a slope (with the horizon high in the frame) emphasizes the distance below. Even a small ascent (like climbing a tower or rock outcrop) can move the horizon and reveal layers not visible from the trailhead.
Practical tip: If drones are allowed, use them for creative angles – e.g. straight-down shots showing a tiny tent on a glacier, or forward-oblique capturing a climber above a vast cirque. When on the ground, keep a map or compass to help orient the shot so that known landmarks (glacier, lake) give scale. In all cases, be mindful of safety: stabilized gear (tripod, harness for camera if needed) can let you shoot from precarious positions without risk.
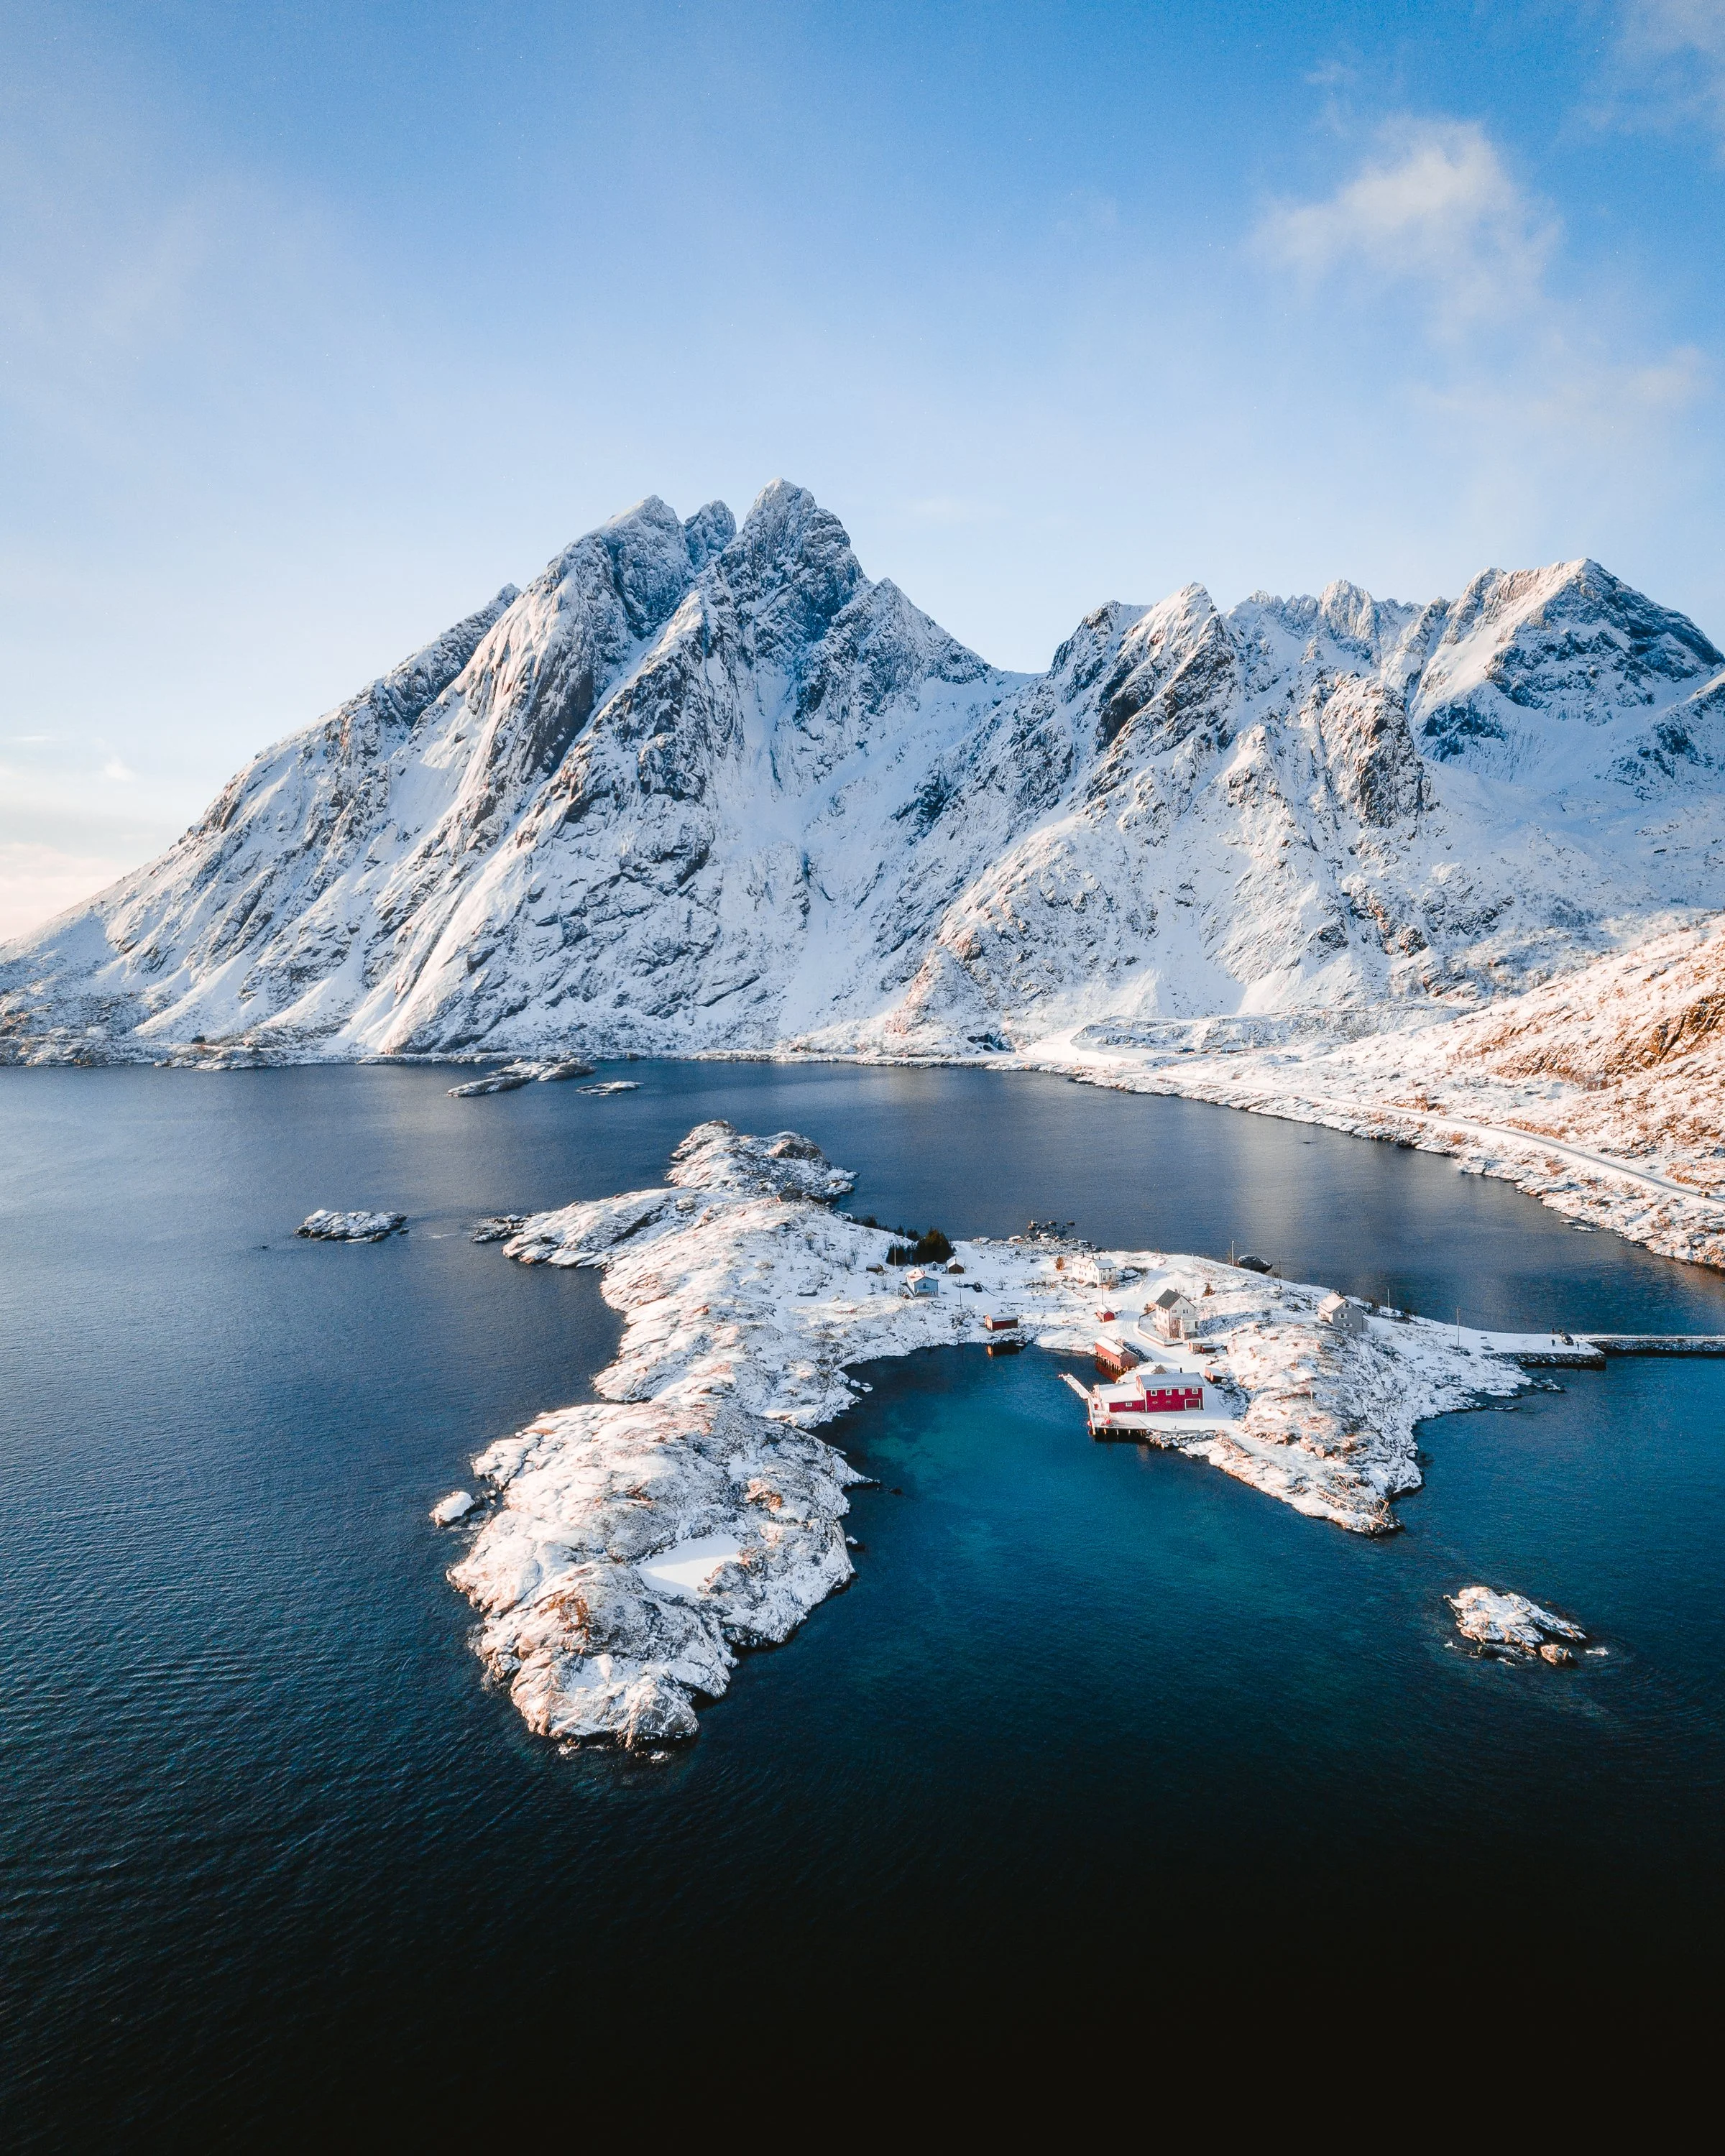
AERIAL VIEWS SHOW A TINY LITTLE RED CABIN BELOW, IN LOFOTEN ISLANDS, NORWAY.
Camera Gear and Camera Settings for Depth
Lenses: Carry at least one wide-angle zoom (e.g. 14–24mm or 16–35mm) for expansive views and a telezoom (e.g. 70–200mm or 100–400mm) for compressed scenesphotographylife.comphotographylife.com. A mid-range zoom like 24–70mm is versatile for focusing on mid-distance layers. For APS-C cameras, adapt focal lengths accordingly (e.g. 10–20mm and 55–200mm). If space allows, a fast normal prime (35mm or 50mm) can double as a bit of both.
Tripod: Use a sturdy tripod for low-angle or long-exposure shots (needed in low light or with small aperture). A ball-head allows quick reorientation between horizontal and vertical compositions.
Filters: A circular polarizer reduces glare and can darken the sky, increasing contrast with distant clouds or mountains. Neutral-density grads help balance bright skies against shaded foregrounds. These help maintain detail in both near and far planes.
Camera settings: Shoot in RAW to recover subtle gradations in distance haze. Use a narrow aperture (f/8–f/16) for maximum depth of field. Focus about one-third into the scene (the classic landscape focus trick) to keep most of the frame sharp. Experiment with focus stacking if foreground and distant subjects require extremely high detail.
Other gear: Binoculars or a long telephoto can help scout distant landscape features (for framing later). Pack a remote shutter or cable release to avoid camera shake during long exposures. In cold alpine conditions, protect gear from condensation by acclimating cameras gradually to temperature changes.


Learning from the Masters
Landscape artists and photographers have long studied depth. Turner’s 19th-century paintings used foreground-middleground-background layering and atmospheric haze to create distance. Ansel Adams, shooting Yosemite, often chose vantage points (like glacier overlook or riverbed) that naturally included multiple layers of forest and rock. Adams’s famous Clearing Winter Storm has mist-filled peaks and large trees in front, showing how even a “normal” lens can achieve depth with composition and fog. In adventure scenarios – say, a backpacking trip or mountain climb – constantly look for visual layers: the trail beneath your feet, the mid-distance valley, and peaks on the horizon. Combine those with changing light (sunrise, sunset, or passing clouds) to accentuate depth. Keep your gear ready to swap lenses, adjust angles, or include your companions as scale.
Through practice, you’ll start to see depth before you shoot: recognizing that a scene has a line to follow, a foreground subject, or fog to your advantage.
By mastering these techniques, even a beginner can make images that draw viewers “into” the photo, not just stand before it.

Sources: Studies on perspective and depth in photographymichaelfrye.combhphotovideo.com, classic landscape photography techniquesmichaelfrye.combhphotovideo.com, and practical guides on scalephotographylife.comphotographylife.com inform the advice above. These principles have been proven by works of Adams, Turner, and contemporary landscape pros
Further Reading & Influences
This article draws from a wide range of professional insights, field-tested techniques, and foundational photographic education. While the content is written in my own words, the following photographers, educators, and platforms helped shape the ideas discussed:
Michael Frye – For his practical teachings on wide-angle composition, using leading lines and foregrounds, and understanding landscape depth. His blog and books are excellent resources for mastering natural light and composition in landscape photography.
Ansel Adams – A pioneer in landscape photography and depth perception through tonal contrast, layering, and atmospheric conditions. His Yosemite images like Clearing Winter Storm remain iconic examples of natural depth and scale.
J.M.W. Turner (painter) – Though not a photographer, Turner’s use of atmospheric perspective in landscape paintings greatly influenced visual storytelling through depth and haze. A reminder that visual cues transcend medium.
Outdoor Photography Guide – For practical advice on using leading lines, S-curves, and scale references to create depth in both landscape and adventure compositions.
B&H Photo Video – For gear-focused insights, particularly how lens focal lengths (wide vs. telephoto) impact depth, compression, and visual scale.
Photography Life – A solid technical resource on using human figures, focal length, and composition to convey scale and depth in outdoor scenes.
These references support the techniques and ideas I use in my own photography — and if you're looking to go deeper, they’re fantastic starting points. I encourage you to explore their work as you develop your own eye for composition, scale, and spatial storytelling.
